My first post in 2017 set out hobby goals for the year (link here). Throughout the 2nd half of 2016 I struggled to dedicated time to hobby so for 2017 I wanted to set some targets! Now, 2017 is almost concluded and 2018 reckons, I wanted to look back and see how I'd fared against my goals.
In term of which models I aimed to complete in 2017; my list consisted of:
I also set myself a target of reading 12 books. I fell short and only managed to read 10... but I listened to 6 audiobooks (thanks to Black Library being on Audible!).
So, in conclusion, I'm happy with my achievements for 2017. I managed to paint up many more models than I had planned. This was mainly down to Nerd Day 2017 and the focus it provided. This event required a board and scenery. which occupied my activities during the middle of the year. After Nerd Day I was infused with the motivation to prepare for gaming in 2018 and managed to bash out the Sylvaneth units mentioned above and Sly Marbo!
Next up I will present the completed Kurnoth Hunters and Orc Blood Bowl team (looks like i forgot to post about the completed unit!). At time of writing this article, I am away visiting family so will cover that unit in a post before closing of 2017 with a 2018 goals article.
So recently there was a live stream on the Warhammer Live Twitch stream called 'Painting Hang Out with Peachy and Duncan'. It was awesome! Really good entertainment and a pleasure to watch.
My hobby progress has been slow over the last month and whilst I've made progress on a variety of models; Blood Angel Tactical Marines, Slyvaneth Kurnoth Hunters, Tree Revenants and 2 Branchwraiths... I haven't finished any or managed to take any recent WIP photos.
This post, however, is mainly to cover a couple of social painting evenings I've hosted recently in preparation for Nerd Day 2018. The goal is to help a couple of friends who haven't painted models for many years to paint up a selection of their models which can then be used during nerd weekend 2018.
For individuals on the fringe of the hobby I believe the notion of painting models can be quite intimidating... not only do you need to understand the techniques involved, there is also an associated cost (paints, brushes etc.) which can easily become a barrier of entry. Hosting events where I can remove those barriers has been very rewarding and, as you can see below, seems to be nurturing some potential talent!
First I'll cover the hobby area! I set up two stations for my budding hobbyists, complete with citadel paint system chart for easy reference.
The only requirement I placed on my two protégé was to supply their own models. Neither let the side down! Dan, arrived armed with some goodies from his childhood! An old skool, 1994, Citadel Paint Set... which had usable paint!! very cool indeed!
Dans also brought along a complete Warhammer (4th? edition) boxed set. It's from this set that Dan chose which models to paint.
Alongside Dans Fantasy Battle models, Barry rocked up with an extended Skaven 3rd Edition Blood Bowl team!
These in progress pictures were taken following the second evening. As you can see, good progress has been made by both hobbyists!
Here are the archers Dan has base coated. I've been very impressed by the state of all the models and can't wait to see further progress in the new year.
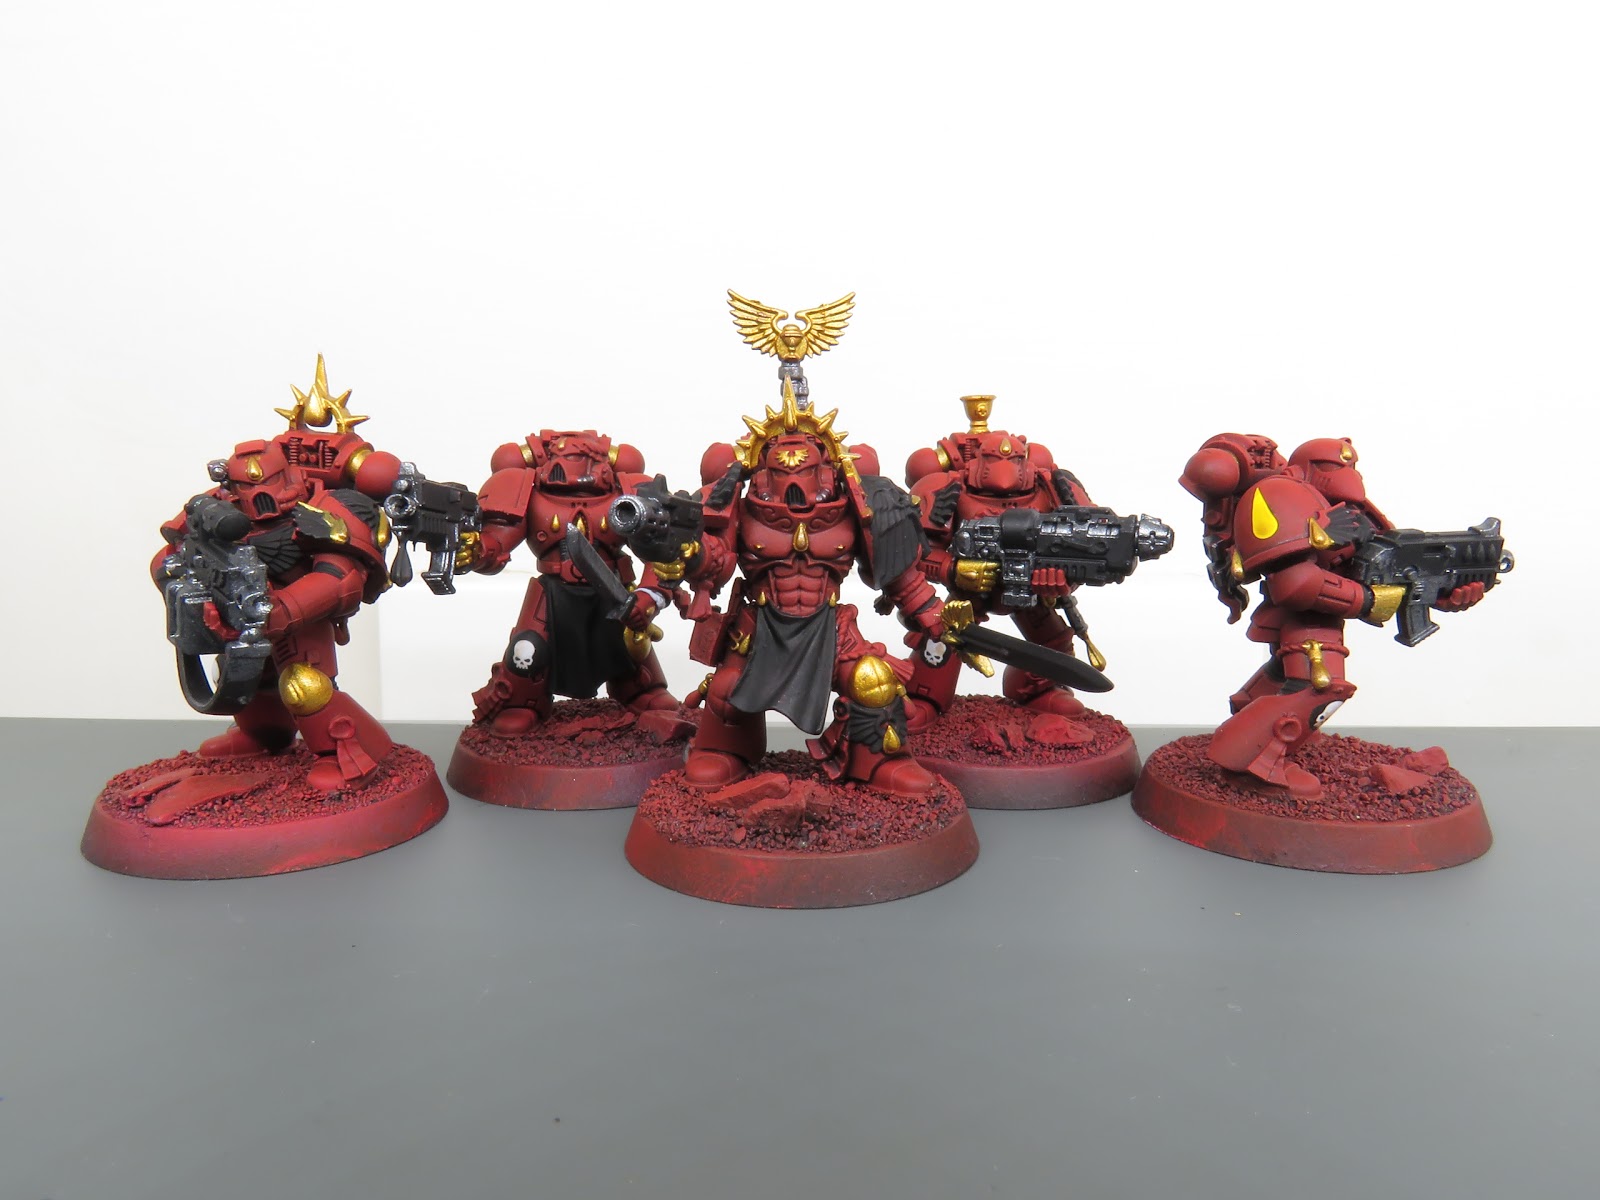
Bit of a change of direction this week! As I ran out of Sylvaneth models, to ensure hobby progress, I turned to a Blood Angels Tactical Squad.
The red armour has been painted since earlier this year so this week I started picking out the details. I'm generally following a Blood Angels Legion paint scheme rather than the Chapter colour scheme - i.e. lots of Gold and Black (to accompany the red).
I posted my BA colour scheme here, however, since then I've altered the process. I will no longer use oil washes as they're just too fiddly (and smelly!)... especially now I've figured out a great technique using Army Painter/Matte Medium paints. In terms of the other colours used so far; the Gold is Citadel Liberators Gold, whilst the silver is Vallejo Model Colour Gun Metal and the black is Vallejo Model Colour Black.
I'll also be using 30K Blood Angels transfers where I can, alongside the 40k Company/Squad markings. This unit has the Blood Angels chapter symbol moulded on each shoulder pad so the opportunity to use the 30k transfers is limited.
Whilst I do have the full 10 man squad, I'm testing out painting 5 models per 'batch' to see if that makes the process more enjoyable. With this in mind, I'll continue to work on this unit over the next week or two. Life is busy at the moment so weekend painting time is limited.
Swiftly following the Brancywych is the final model from the start collecting box I picked up in February. Thanks to the airbrush I was able to get him fully painted up in about 3 days… which was a bit of a surprise!
I’m happy with how he has come out although I am slightly questioning the general colour scheme I’ve chosen for my Sylvaneth force. It's just a little flat. I'm not going to do anything about it at this point... I’ll ponder what I could add and then come back at a later date if the mood takes me.
So, let's go through the stages and paints used.
First of all, I glued the model together using as little superglue as possible so that once he had been primed I could break him back down into sub-assemblies (for the rest of the painting process). As usual, I primed through the airbrush using black Vallejo primer and then grey Vallejo as a zenithal highlight from above.
The main bark ‘armour’ received coats of Dryad Bark, Gorthor Brown, Baneblade Brown, Ushabti Bone and Screaming Skull in ever decreasing amounts. The lighter green on the bark was applied using a mix of Ogryn Camo and Screaming Skull.
Once the main bark had been painted, I broke the model down into various sub-assemblies. I then airbrushed the bark ‘flesh’ and ends of the branches with Caliban Green.
The yellow areas were painted with Averland Sunset and highlighted with Flash Gitz Yellow. The leaves were painted with Moot green and edge highlighted with Flash Gitz Yellow. I usually apply a glaze of Lamenters Yellow glaze to the leaves but I forgot this step. Oops.
The talons on his left hand were painted with Dark Reaper and Thunderhawk Blue. The staff was painted with Dryad Bark and dry brushed with Sylvaneth Bark. His runes were painted with a slightly watered down Baharroth Blue.
After all the base colours and highlights had been applied, I applied a couple of coats of gloss varnish and then, once that had dried, I mixed up a wash of 1 part Army Painter Soft Tone and 1 part Army Painter matte wash medium. This applied the subtle shading I wanted and the matte medium also removed the shiny gloss effect.
Once the model was completed, I turned my attention to the base. As with all big models, this chap had quite a large base! I textured the base with a mix of small stones, sand and some detail pieces from the Sylvaneth kit. I then painted these using the same base colours used on my other Sylvaneth models. I also used the same static grass, spring leaves and daffodils that you can see on my other Sylvaneth. What I did differently on this model, however, was to build a shallow pool area for which I could test pouring some clear resin. I will cover this technique in a future post, but I'm pleased to say that it all worked nicely and looks pretty awesome!
As is tradition when I go on holiday, I try and visit the nearest GW shop to check it out and also pick up a little something. On the weekend of the 16th September my wife and I celebrated our first wedding anniversary and had planned a short break in Brussels... mainly to drink awesome beers and eat delicious chocolate!
The store itself is located in the heart of Brussels and is one of the best GW shops I've visited. It was big, lively, well laid out, had some great displays and the staff were great!
I'd like to say that mistakes were made, but these aren't mistakes! Cant wait to get them built and painted!
After the success of the Dryads, I was able to bash through this model very quickly! I love how she has come out and how quickly I am getting through the Sylvaneth models. A combination of my chosen process, the airbrush and the organic nature of these models is synergising perfectly!
The bark was painted using Dryad Bark > Gorthor Brown > Baneblade Brown > Ushabti Bone > Screaming Skull in ever decreasing amounts. I Actually didn't need to paint so many layers! The Dryad Bark and Gorthor Brown were applied because I, mistakenly, started off using a picture of a Branchwych from another grove and not from Harevestboon!
Once I started using the correct pictures from the Battletome as my guide, I noticed that the Branchwych had a slight green tone around some of her areas of bark. This green was applied using a 1/1 mix of Ogryn Camo and Ushabti Bone.
The dark green followed the same process and paint as that used on the Dryads: Caliban Green.
The extra details on this model (compared to the Dryads) focused on the lovely little grub which is along for the ride and the scythe.
The shaft of the weapon was painted with Dryad bark and heavily dry brushed with Dryad Bark. The blade was airbrushed with White Scar and then I applied Baharroth Blue through the airbrush to achieve the effect. I used Gulliman Blue glaze in the rune on the blade to make them stand out. Finally, the leaves on the weapon were painted in the same way as the Dryads. Moot Green with a glaze of Lamenters Yellow.
As for the little grub. I painted his chitin with The Fang and dry brushed a highlight of Fenrisian Grey. Its face was painted with Baharoth Blue. Its teeth and feet were painted with the usual colours for bone - Zandri Dust > Ushabti Bone > Screaming Skull.
After the basecoats were complete I applied a coat of gloss varnish and then, once that had dried overnight, I mixed up a wash of 1/1 Amry Painter matte medium and Soft Tone. This was then applied all over the model (except for the blade on the weapon).
The base was finished in the same method as the Dryads.
Hot on the heels of last weeks work in progress (WIP), these models are now done! I'm absolutely thrilled at how they have come out. This is the first unit to which I've applied my new process (which I covered here). I'll cover the paints/process below and then follow up with a conclusion.
The basics of the process flow is as follows:
Prime. Airbrush first with black and then, from above, with grey,
Base coats. First using the airbrush as much as possible, then with paint brush,
Gloss varnish,
Shade. Applied a 50/50 mix of Army Painter Soft Tone and Army Painter Wash Medium,
Apply details to base,
Matte varnish.
For the main bark colour I first applied Baneblade Brown and the highlighted up through Ushabti Bone and finally Screaming Skull. The green accents were applied with Caliban Green. The leaves were painted Moot Green and the bark 'robe' was painted Waagh! Flesh. Finally, the blue runes were painted with slightly diluted Baharoth Blue.
For the base, I airbrushed Dryad Bark and then highlighted areas with Gorthor Brown and Baneblade Brown. The wood details were painted with Mournfang Brown whilst the sprites were painted White Scar and glazed with Gulliman Blue and Bloodletter. Other details like the rocks and skulls were painted with the Mechanicus Standard Grey/Zandri Dust and highlighted up with the standard colours detailed in the Citadel Painting System.
After the gloss varnish had been applied I mixed up the 50/50 mix of Soft Tone and Mixing Medium. This is the first time I had used these washes but the wash mix worked perfectly! the wash toned down the colour scheme perfectly and applied a subtly shade with no coffee staining! the wash also completed matted down the models which was nice!
Finally, I turned my attention to the bases. First off I applied tufts of Daffodils to roughly half the models. After that, I applied some vibrant grass flock and finally added some leaves onto the rocks. to seal everything in place I applied a heavily diluted PVA/water mix to the bases. Once that had dried I painted the rim of the bases with Steel Legion Drab and applied a light coat of matte varnish.
In conclusion, I'm super happy with this unit. It's easily the best unit of models I've painted and fills me with great confidence as to how my Sylvaneth force will turn out. I've spent an awful lot of time thinking about my painting technique finding a process which fits my style. I've finally found it and the feeling that the models I'm producing are closer to the standards I set myself is fantastic!
Next up to apply the same process to a Branchwych.
Here we have a WIP of the Dryads. So far I have completed the base coats I’ll be applying with the airbrush. As I mentioned in a previous post, I’ll be following the colour scheme of the Harvestboon clan; as you can see below from one of the example colour schemes which the Dryads of Harvestboon follow, I’ve gone for a pale brown fading into green at the extremities of each model.
The models have been undercoat with black Vallejo primer with was then followed up with grey Vallejo primer, applied from a zenith perspective (e.g. from above).
Next, I painted the brown bark . This was achieved by airbrushing Baneblade Brown onto the model and then gradually highlighting the with Ushabti Bone and then Screaming Skull. It’s worth pointing out that I’ll be applying the shade as the last step of painting these models so at this point I am deliberately aiming to paint the models to a degree lighter than they will finally be.
Once the bark had dried I moved on to the green. This was once again airbrushed on in order to achieve natural transitions. First of all I applied a 1-1 mix of Caliban Green and Ushabti Bone. Then I slowly added more Caliban Green and applied these shades closer to the end of the areas being painted green.
Finally I turned my attention to the bases. Dryad Bark was first airbrush all over the base and then subtly highlighted with Gorthor Brown & Baneblade Brown.
As these steps concluded the airbrushing of the base coats, I sealed the paint onto the models with a couple of coats of Vallejo matte varnish.
Next up I will pick out the remaining base colours, apply highlights to those areas, apply gloss varnish and then finally shade the model down. After that I will have some fun with the bases!
This week I’ve started working on my Sylvaneth in the form of the 16 Dryads which came as part of the start collecting box which I picked up back in February.
I’ve been itching to start this project as it will involve a very different painting style compared to Space Marines. It will, therefore, require different skills and provide a new set of experiences. In particular, I’m really looking forward to testing out my fine detail airbrush game!
The Paint Scheme
After reading the Sylvaneth Battle Tome I found myself to have an affinity with the Harvestboon glade. They are a youthful clan, not as ‘regal’ or ‘twisted’ as some other clans and they fit with the spring seasonal theme I want to base my models with.
The Harvestboon colours mainly focus on greens with a more sombre accent of softer tones... but also with some bright yellow/green foliage.
Bases!
I plan to add a fair amount of detail to the bases of my models. I have a pack of Daffodil tufts as well as ‘Spring’ leaves. Whilst I haven’t tested any of these materials out yet, my aim is to sparingly use a combination of these two materials alongside some static grass over a brown texture base.
I’ll follow this post up with a WIP of the Dryads as soon as I can.
After the success of BatchCon 2017, I wanted to make a post about the plan for next years event.
So, planning is now firmly underway for next years day of wargaming goodness! BathCon 2017 focused largely (well, entirely!) on the sci-fi side of gaming with X-Wing, Shadow War: Armageddon and Warhammer 40,000 being what we played, next years event will take a more fantasy-focused theme. Blood Bowl, Gorechosen, ShadeSpire and Age of Sigmar will be systems we focus on.
Both I and my long-term hobby boyfriend (known as Bob) are going to focus on Age of Sigmar armies over the coming months. We will be visiting Warhammer World for a weekend of gaming at the end of April. This will be split between 40k and AoS so we need to get some armies built and painted! I will be working to paint up 1000 points of Sylvaneth whilst Bob will be working on the same point value of Khorne Bloodbound. Obviously, the benefit of this is that, for BathCon 2018, we will have 2 suitable armies to game with. I also have a small force of Stormcast Eternals and Nurgle Daemons whereas Bob has Khorne and Nurgle Daemons as well… so there will be plenty for us to use!
We also will likely dabble in some Blood Bowl seeing as I have fully painted Orc and Human teams and one of this year's guest has metal Skaven and High Elf teams which I’m sure he’ll look forward to dusting off. Blood Bowl can take a long time to play so I suspect we will limit the time dedicated to this game to one-half of a match.
Alongside these games, Bob has picked up Gorechosen and this would be a perfect event to roll out the 4 player game of blood, guts and decapitations! Bob is also pondering picking up Warhammer Quest Silver Tower so that may also find its way onto the order of play!
Finally, there’s ShadeSpire. At the time of writing, this is an unreleased game but both Bob and I will be picking it upon release.
One last thing to mention… Some of these games will require a suitable board to play on! Having spent the last 7-8 months preparing a good 40k board, it looks like 2018 will see my focus shift on to preparing a fantasy style board. More on this soon!
Throughout 2017, whilst I've been working on scenery for BathCon 2017, I've spent a lot of time experimenting with various painting techniques trying to find methods of painting which fit with my hobby goals, style and ability. In short, the goal has been to find a technique which takes advantage of an airbrush, is quick to apply and which yields good results. I'm pleased to write that I think I've found the right combination of techniques to achieve my goal! This post covers how I've got to this monumental moment :)
Airbrush
So, I've had my airbrush for nearly 4 years. 2017 is the year I finally got to grips with it as a tool. In the past, I always found that the cleaning and maintenance put too much of an overhead on the benefits I reaped from its use. Enter stage left a glass full of water! This very simple addition to my Airbrush regime has made all the difference! Whenever I finish using my airbrush I wash it out in the sink and then simply place it in the cup of water... sometimes for weeks in between use. This ensures that there is never any dried paint to clean out before use and allows for much quicker applications of paint when required.
As a benefit of this, I also cracked the method for preparing paints for use with the Airbrush. You need thin paints! Almost all of my paints are GW. I like the clearly defined painting system they employ in regards to base coats and their matching layer paints. The downside of this is that I need to water down the paints before use in the airbrush. I've found that a suitable mix of paint, water and Vallejo Airbrush Flow Improver make it very easy to dilute the paint enough to work through the airbrush without any problem.
Shading
Now on to the big one! Shading has been the area of the process which has involved most experimentation, failure and therefore required most thought to nail.
Shading is a very important step in painting a miniature and I have been on a mission to find a suitable method of applying a wash which is quick, gives awesome results and most importantly doesn't result in a need to reapply base paints to tidy up the shade. Not only is such an action a waste of time it is also very challenging to adequately reapply base paints when they have been airbrushed and so are likely part of a transition. I realise that applying a targeted ‘pin’ wash would solve this but that option would take too much time so wasn’t an option.
Initially, I attempted to follow the method recommended by the top dawg, Kenny Boucher, of Next Level Painting. Kenny’s recommended method involved coating the model in gloss varnish and then using a gloss Nuln Oil or Agrax Earthshade wash. The combination of the gloss varnish and gloss shade ensure that the surface tension of the wash is maintained and drastically reduced any ‘coffee staining’ which can occur. I initially found this method to give positive results: I used in on a Blood Angels Tactical Squad early on in the year, however, some coffee staining did occur. Later, when using this method I encountered some issues when the wash seemingly dissolved the gloss varnish coat. This had some very problematic results for the Shadow War: Armageddon terrain I posted about back in June. It's worth noting though that I don’t think this was due to the wash/technique… more I’d either applied the gloss varnish to thinly or that I hadn’t left it long enough to dry (or both!).
As I appear to be covering this in chronological order, next up, during the summer I was listening to an episode of the fantastic Sons of Heresy podcast and the hosts mentioned following a shading technique they learnt during a seminar at a Horus Heresy event. After a quick YouTube search, a video of a chap called Mark Bedford who works at ForgeWorld revealed not only the secrets of how to apply a great wash but also how to follow a quick painting process to get your models on the board. I’ve included it below as it’s a fantastic video and well worth a watch, but the section which stood out for me revolved around his wash mixture… and how he applies the wash as the last stage of painting a miniature.
Andy’s wash mixture stood out as it seemed to promise the answer to the coffee staining problem. Essentially one mixes 1 part Nuln Oil, 1 part Seraphin Sepia, 1 part Lahmain Medium and 3 parts water to produce a subtle wash mixture; applied after a coat of gloss varnish. I tried this mix on 3 of the GW Objective Markers which were released along with 8th Edition. The washes worked fantastically aside from white residue which appeared in the areas where the wash had pooled the most. Upon investigation, it appears that this is due to the water element of the wash. Diluting GW washes with water is a huge no-no!
Base - Highlight - Shade
Following on from unlocking the ultimate shade formula I'd like to cover the idea of base coating, then highlighting and finally shading. This is, of course, different from the GW painting system of Base - Shade - Highlight! I feel that if one chooses to use an airbrush as the primary method to apply base coats and use gradual transitions for highlight (and also some shadows), following the traditional process causes issues as maintaining the transitions is difficult. Alternatively, if one can apply the highlight before shading the model... and the shade doesn't cause any coffee staining, that's ideal!
The trick is to highlight the model to '11' in preparation for the colour muting down. Whilst painting many of the large GW bits of scenery I've worked on, namely the Sector Mechanicum (Shadow War: Armageddon terrain), I noticed how the final colour of the terrain was always coming out darker than I desired. There were two reasons for this, 1) that the airbrush layers became less vibrant when dry and 2) as already indicated, the wash when applied also reduced the vibrancy of the colour. On some of the later pieces of scenery, I got used to highlighting the model to '11' in preparation for the toning back of the colours and found that it works perfectly! The bonus is that applying the shade last means your models look suitably muted and 'realistic' (as opposed to a cartoony look).
Pulling it all together
When painting my most recent model, Sly Marbo, I took the opportunity to bring together all the lessons learnt (mentioned above!). The shade was mixed up using 1 part Nuln Oil, 1 part Seraphin Sepia and 4 parts Lahmain Medium (essentially replacing the water element from Andy Bedford's mix with an increased amount of Lahmain Medium. Happily, it worked a treat and in conjunction with all my learning, he looks great!
In conclusion, I feel like my understanding of painting has increased a lot this year. My abilities with a paint brush (or airbrush) may not be top drawer but what skill I do have, combined with the techniques I’ve mentioned in this post, should mean I’m able to increase my output and for the models to be of a higher quality than I was previously achieving.
The learning never stops though... Next up I will be focusing on my Sylvaneth force. These models will provide a fantastic opportunity to refine the process on some amazing, organic miniatures. I’ve also ordered some Army Painter shades and shade medium as I’ve heard great things about their shades. I will use these to mix a wash along the lines as that mentioned above.
Hot on the heels of BathCon 2017, I've been working on Sly Marbo.
This is an old GW model which I wanted to add to my collection due to his rules as a 'one man army' in Shadow War: Armageddon. I picked him, minus 1 arm and thickly coated in a rather terrible paint job from eBay for about£5! The arm was replaced with one from the Catachan set (again, an eBay purchase). My friend Dan used him (whilst still unpainted) with spectacular results during BathCon 2017. I will be starting to work on my Sylvaneth and Blood Angels models in preparation for a trip to Warhammer World in April 2018 but I wanted to get this guy painted up before starting those larger projects.
For this model, I used tested out a new process- this involved painting his base coat and highlights before shading. I really enjoyed this process; it was quick and will certainly be the process I now follow for all future models.
I base coated him with Bugmans Glow for the skin, Death World Forest for his vest, Caliban Green for his trousers and Dryad Bark for the pouches. Alongside those main colours, I painted the base with a mix of Mechanicus Standard Grey/Dryad Bark and Screaming Skull for the copper pipes.
As this guy is a 'one man army' in the context of how I will use him, I wanted to add a more detailed base. The base used here was taken from the Warhammer 40K basing kit which was glued to the top of a 25mm base.
Each colour was then highlighted using the recommended colours from the Citadel Painting System chart. Once complete the whole model was coated in gloss varnish in preparation for the wash.
The final steps involved shading the model using a mix of Nuln Oil/Reikland Fleshshade/Lahmain Medium. After that was dry I added Nihilakh Oxide/Nurgle's Rot to the pipes and a wash of Beil-Tan green to the lower half of the knife. Finally, a couple of thin coats of matte varnish were airbrushed on to the model to matte down and protect the miniature.
In conclusion, I am very happy with how he has come out. The new process, combined with the use of more delicate washes (diluted with Lahmain Medium) has allowed me to quickly paint this model to a good standard. As is always the case, I try and take learning forward... onwards to Tree Folk and the Sons of Sanguinius!
BathCon 2017 was the wargaming day I've planned since the beginning of this year. On the weekend of 2nd September, I hosted 3 friends for a full day of X-Wing, Shadow War: Armageddon and Warhammer 40,000... and then some Poker!
Since I organised the event it has been the sole focus of my hobbying time. My goal was to get into a position where I could present a gaming table full of painted terrain and where possible fully painted models. Whilst achieving all the goals I set myself was impossible, I was able to prepare all the scenery pieces I wanted to paint. With one of the game on the roster being Shadow War: Armageddon this was no small feat!
Prior to the event, I ran a roll to determine which game systems my guests would like to play. the 3 winners were X-Wing, Shadow War: Armageddon and Warhammer 40k. The two games which lost out were Age of Sigmar and Blood Bowl.
So, here are some of the photos from the day...
The Board
This is the board set up prior to the event. Whilst I made posts on this blog covering some of the pieces of terrain used, I didn't post about them all. Over the coming weeks, I will probably catch up with such posts as I learnt a lot from my experiences and would like to share that information.
X-Wing
To kick things off we played 2 games of X-Wing. It's been about 18 months since I last played and had forgotten how much fun it can be! I played a simple 50 point match whilst the other game involved a few more models on each side(as can be seen in the picture below).
Shadow War: Armageddon
We chose to play a 4 player battle in SWA, so 1v1v1v1... which turned out to be a lot of fun! We played it on the full 6v4 table packed full of terrain. It took 3 hours.. which is a bit longer than most SWA battles are supposed to last but it was hugely entertaining. We had Orks v Chaos Marines v Space Marine Scouts v Sly Marbo! the Orks and Chaos Marines spent most of the battle trying to tickle each other to death in combat whilst Sly Marbo did some cheeky stabby-stabby moves with his poisoned knife. The less said about the Space Marine Scouts the better!
Warhammer 40,000
Finally, we played some 40k. a 50 power level battle. Chaos v Space Marines/Blood Angels. Unfortunately, we ran out of time and only managed 1 turn each before having to call it a day.