Social Media


26 October 2017

Work In Progress Blood Angels Combat Squad

Bit of a change of direction this week! As I ran out of Sylvaneth models, to ensure hobby progress, I turned to a Blood Angels Tactical Squad.


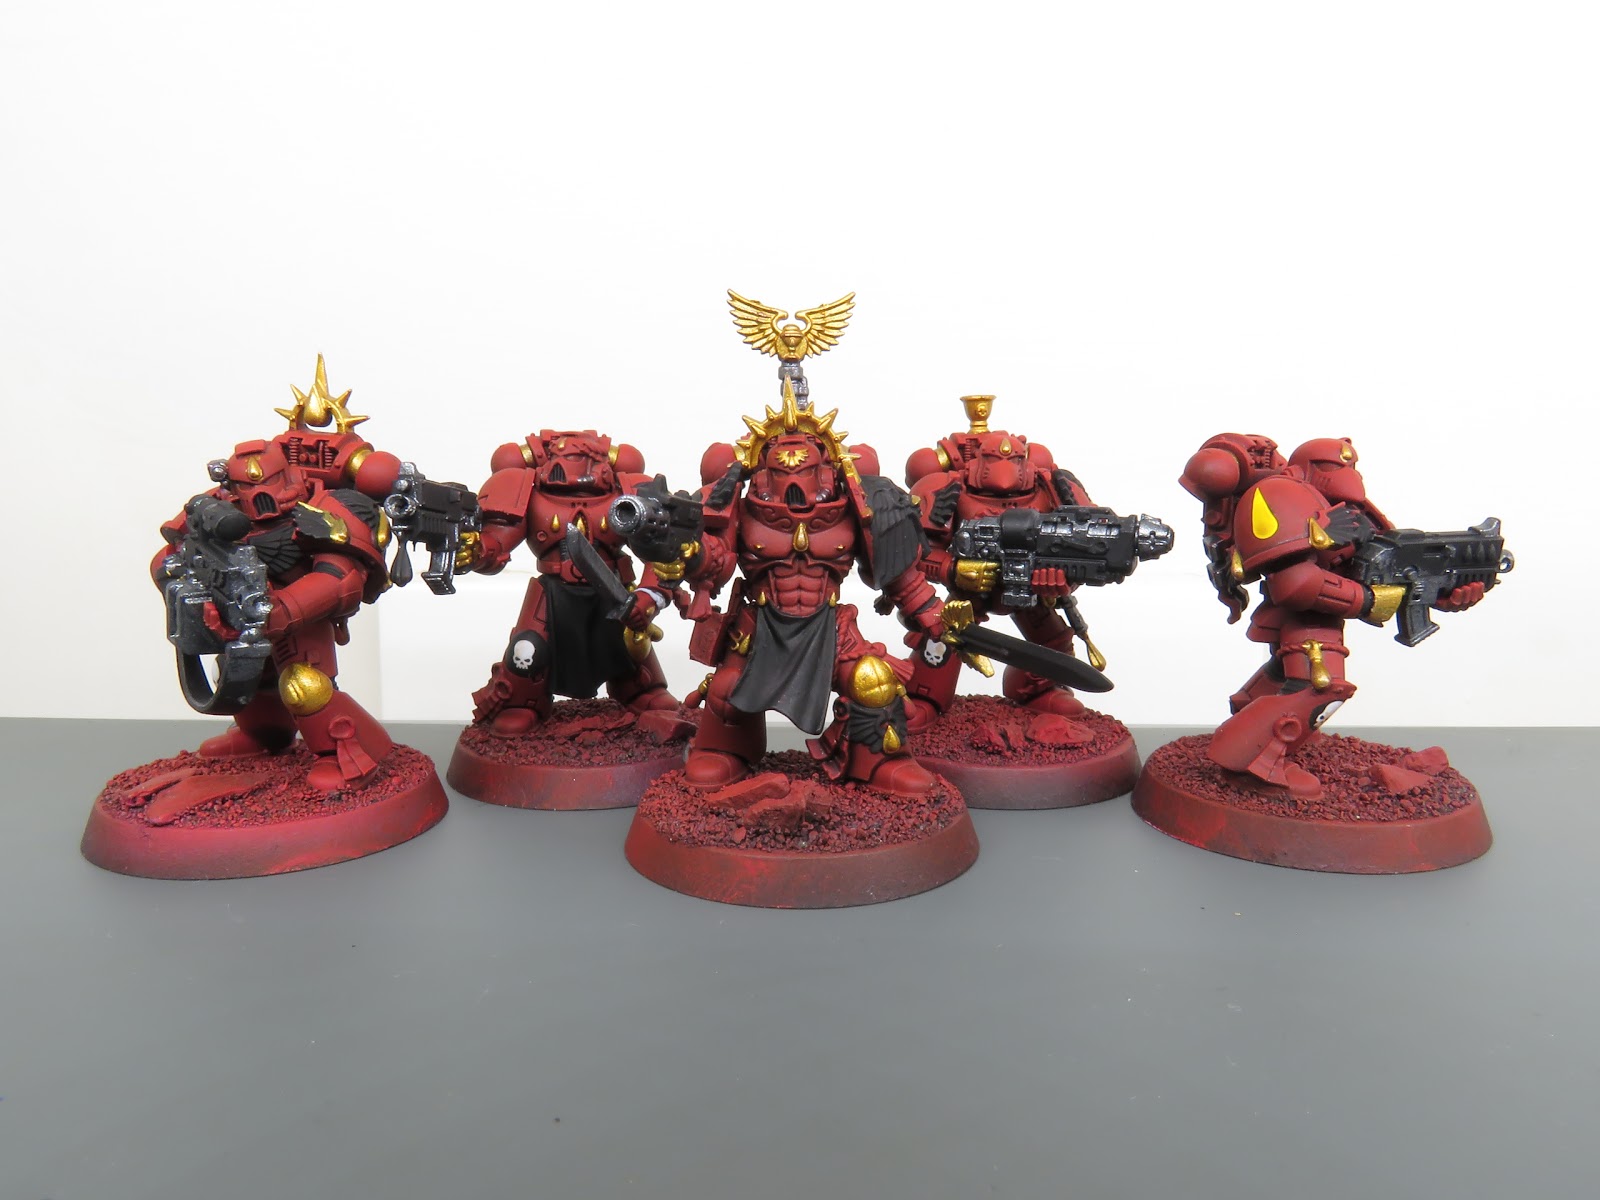
The red armour has been painted since earlier this year so this week I started picking out the details. I'm generally following a Blood Angels Legion paint scheme rather than the Chapter colour scheme - i.e. lots of Gold and Black (to accompany the red). 

I posted my BA colour scheme here, however, since then I've altered the process. I will no longer use oil washes as they're just too fiddly (and smelly!)... especially now I've figured out a great technique using Army Painter/Matte Medium paints. In terms of the other colours used so far; the Gold is Citadel Liberators Gold, whilst the silver is Vallejo Model Colour Gun Metal and the black is Vallejo Model Colour Black.


I'll also be using 30K Blood Angels transfers where I can, alongside the 40k Company/Squad markings. This unit has the Blood Angels chapter symbol moulded on each shoulder pad so the opportunity to use the 30k transfers is limited.


Whilst I do have the full 10 man squad, I'm testing out painting 5 models per 'batch' to see if that makes the process more enjoyable. With this in mind, I'll continue to work on this unit over the next week or two. Life is busy at the moment so weekend painting time is limited.


16 October 2017

Sylvaneth Treelord Ancient

Swiftly following the Brancywych is the final model from the start collecting box I picked up in February. Thanks to the airbrush I was able to get him fully painted up in about 3 days… which was a bit of a surprise!


I’m happy with how he has come out although I am slightly questioning the general colour scheme I’ve chosen for my Sylvaneth force. It's just a little flat. I'm not going to do anything about it at this point... I’ll ponder what I could add and then come back at a later date if the mood takes me.


So, let's go through the stages and paints used.

First of all, I glued the model together using as little superglue as possible so that once he had been primed I could break him back down into sub-assemblies (for the rest of the painting process). As usual, I primed through the airbrush using black Vallejo primer and then grey Vallejo as a zenithal highlight from above.

The main bark ‘armour’ received coats of Dryad Bark, Gorthor Brown, Baneblade Brown, Ushabti Bone and Screaming Skull in ever decreasing amounts. The lighter green on the bark was applied using a mix of Ogryn Camo and Screaming Skull.


Once the main bark had been painted, I broke the model down into various sub-assemblies. I then airbrushed the bark ‘flesh’ and ends of the branches with Caliban Green.

The yellow areas were painted with Averland Sunset and highlighted with Flash Gitz Yellow. The leaves were painted with Moot green and edge highlighted with Flash Gitz Yellow. I usually apply a glaze of Lamenters Yellow glaze to the leaves but I forgot this step. Oops.

The talons on his left hand were painted with Dark Reaper and Thunderhawk Blue. The staff was painted with Dryad Bark and dry brushed with Sylvaneth Bark. His runes were painted with a slightly watered down Baharroth Blue.


After all the base colours and highlights had been applied, I applied a couple of coats of gloss varnish and then, once that had dried, I mixed up a wash of 1 part Army Painter Soft Tone and 1 part Army Painter matte wash medium. This applied the subtle shading I wanted and the matte medium also removed the shiny gloss effect.

Once the model was completed, I turned my attention to the base. As with all big models, this chap had quite a large base! I textured the base with a mix of small stones, sand and some detail pieces from the Sylvaneth kit. I then painted these using the same base colours used on my other Sylvaneth models. I also used the same static grass, spring leaves and daffodils that you can see on my other Sylvaneth. What I did differently on this model, however, was to build a shallow pool area for which I could test pouring some clear resin. I will cover this technique in a future post, but I'm pleased to say that it all worked nicely and looks pretty awesome!


9 October 2017

Games Workshop: Brussels

As is tradition when I go on holiday, I try and visit the nearest GW shop to check it out and also pick up a little something. On the weekend of the 16th September my wife and I celebrated our first wedding anniversary and had planned a short break in Brussels... mainly to drink awesome beers and eat delicious chocolate!

The store itself is located in the heart of Brussels and is one of the best GW shops I've visited. It was big, lively, well laid out, had some great displays and the staff were great!


I'd like to say that mistakes were made, but these aren't mistakes! Cant wait to get them built and painted!

6 October 2017

Sylvaneth Branchwych

Today I'm presenting a Sylvaneth Branchwych.

After the success of the Dryads, I was able to bash through this model very quickly! I love how she has come out and how quickly I am getting through the Sylvaneth models. A combination of my chosen process, the airbrush and the organic nature of these models is synergising perfectly!


The bark was painted using Dryad Bark > Gorthor Brown > Baneblade Brown > Ushabti Bone > Screaming Skull in ever decreasing amounts. I Actually didn't need to paint so many layers! The Dryad Bark and Gorthor Brown were applied because I, mistakenly, started off using a picture of a Branchwych from another grove and not from Harevestboon!

Once I started using the correct pictures from the Battletome as my guide, I noticed that the Branchwych had a slight green tone around some of her areas of bark. This green was applied using a 1/1 mix of Ogryn Camo and Ushabti Bone.

The dark green followed the same process and paint as that used on the Dryads: Caliban Green.


The extra details on this model (compared to the Dryads) focused on the lovely little grub which is along for the ride and the scythe.

The shaft of the weapon was painted with Dryad bark and heavily dry brushed with Dryad Bark. The blade was airbrushed with White Scar and then I applied Baharroth Blue through the airbrush to achieve the effect. I used Gulliman Blue glaze in the rune on the blade to make them stand out. Finally, the leaves on the weapon were painted in the same way as the Dryads. Moot Green with a glaze of Lamenters Yellow.

As for the little grub. I painted his chitin with The Fang and dry brushed a highlight of Fenrisian Grey. Its face was painted with Baharoth Blue. Its teeth and feet were painted with the usual colours for bone - Zandri Dust > Ushabti Bone > Screaming Skull.

After the basecoats were complete I applied a coat of gloss varnish and then, once that had dried overnight, I mixed up a wash of 1/1 Amry Painter matte medium and Soft Tone. This was then applied all over the model (except for the blade on the weapon).

The base was finished in the same method as the Dryads.

2 October 2017

Sylvaneth Dryads

Hot on the heels of last weeks work in progress (WIP), these models are now done! I'm absolutely thrilled at how they have come out. This is the first unit to which I've applied my new process (which I covered here). I'll cover the paints/process below and then follow up with a conclusion.


The basics of the process flow is as follows:
  1. Prime. Airbrush first with black and then, from above, with grey,
  2. Base coats. First using the airbrush as much as possible, then with paint brush,
  3. Gloss varnish,
  4. Shade. Applied a 50/50 mix of Army Painter Soft Tone and Army Painter Wash Medium,
  5. Apply details to base,
  6. Matte varnish.


For the main bark colour I first applied Baneblade Brown and the highlighted up through Ushabti Bone and finally Screaming Skull. The green accents were applied with Caliban Green. The leaves were painted Moot Green and the bark 'robe' was painted Waagh! Flesh. Finally, the blue runes were painted with slightly diluted Baharoth Blue.


For the base, I airbrushed Dryad Bark and then highlighted areas with Gorthor Brown and Baneblade Brown. The wood details were painted with Mournfang Brown whilst the sprites were painted White Scar and glazed with Gulliman Blue and Bloodletter. Other details like the rocks and skulls were painted with the Mechanicus Standard Grey/Zandri Dust and highlighted up with the standard colours detailed in the Citadel Painting System.

After the gloss varnish had been applied I mixed up the 50/50 mix of Soft Tone and Mixing Medium. This is the first time I had used these washes but the wash mix worked perfectly! the wash toned down the colour scheme perfectly and applied a subtly shade with no coffee staining! the wash also completed matted down the models which was nice!


Finally, I turned my attention to the bases. First off I applied tufts of Daffodils to roughly half the models. After that, I applied some vibrant grass flock and finally added some leaves onto the rocks. to seal everything in place I applied a heavily diluted PVA/water mix to the bases. Once that had dried I painted the rim of the bases with Steel Legion Drab and applied a light coat of matte varnish.

In conclusion, I'm super happy with this unit. It's easily the best unit of models I've painted and fills me with great confidence as to how my Sylvaneth force will turn out. I've spent an awful lot of time thinking about my painting technique finding a process which fits my style. I've finally found it and the feeling that the models I'm producing are closer to the standards I set myself is fantastic!

Next up to apply the same process to a Branchwych.